こんにちは。
技術部のtakaです。
今回の記事は、先日投稿いたしましたRemoteCollectorについての記事で、(https://cloudsolution.terilogy.com/blog/sumologic_remote-collector)
- ソースのデータ取得頻度はどのくらいなのか
- ログ収集対象がLinux(Ubuntu)である場合はどのように設定を行うのか
の二つの質問をいただきました。
今回の記事は、この質問に回答する形となります。
ソースのデータ取得頻度について
データ取得頻度は、インストールされた機器で利用可能なCPU処理リソースをどの程度使うかの設定によって、以下のように変動します。
- Local Fileソースは、2~最大20秒間隔
- Remote Fileソースは、30秒~最大3分間隔
最小値は、デフォルトの設定(Unlimited)である場合
最大値は、20%と設定した場合
CPU処理リソースをどの程度使うかの設定
Sumologicの左サイドバーでManage Data>Collectionに遷移。
その後、コレクターのEditをクリックしてください。

コレクターの設定ウインドウで、最後までスクロールし、Advancedをクリックしてください。
そうすると、CPU処理リソースをどの程度使うかの設定であるCPU targetの設定を行うことが出来ます。
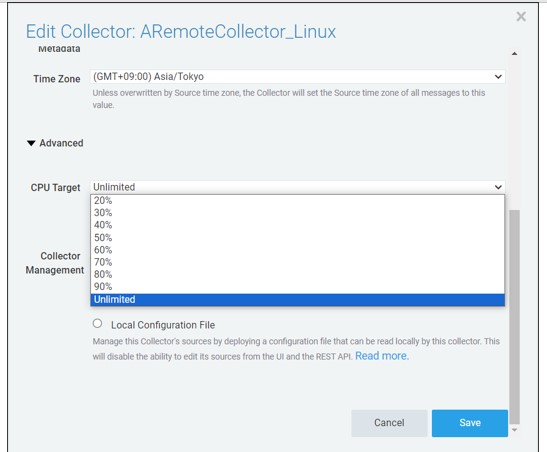
設定後は、ウインドウ右下のSaveボタンをクリックしてください。
ログ収集対象がLinux(Ubuntu)である場合の環境について
前回の記事では、ログ収集対象機器とリモートから収集しに行く機器がともにWindowsで行いました。
今回の記事では、ログ収集対象機器をLinuxのUbuntuで実施します。
ディストリビューション及びOSバージョンなど環境は以下の通りです。
ログ収集される側
- Ubuntu Version 22.04 LTS
- ログ収集対象パスは、デフォルトでapatchのアクセスログがある
/var/log/apache2/access.log - IPアドレス:172.16.192.55
ログ収集する(Installed Collectorがインストールされている)側
- Windows Server 2022 Standard
- バージョン 21H2
ソースについて
ログ収集対象がLinux(Ubuntu)である為、先日の記事で取り上げましたリモートwindowsイベントログソースとUNCを利用したLocal Fileソースは利用できません。
今回は、SSHを使ったRemote Fileソースで設定を行います。
SSHを使ったRemote Fileソースを使うにあたって、ログ収集される対象機器は以下の設定を行う(行われている事を確認)する必要があります。
- SSHサーバのインストール
- FWの22番ポートの許可
- Installed Collectorがログ収集のため利用するユーザの設定
- ログ収集対象が存在するパスのアクセス権限設定
ログ収集対象機器での設定
1.SSHサーバのインストール
まず、現在のログ収集対象機器で、SSHサーバがインストールされているかを確認する為、以下のtest@linuxserver:/var/log/apache2$から太文字で記載されているコマンドを実行してください。
test@linuxserver:/var/log/apache2$ dpkg -1 | grep ssh
ii libssh-4:amd64            0.9.6-2ubuntu0.22.04.3    amd64      tiny
C SSH library (OpenSSL flavor)
ii openssh-client            1:8.9p1-3ubuntu0.6          amd64       secur
e shell (SSH) client, for secure access to remote machines
ii openssh-server             1:8.9p1-3ubuntu0.6          amd64       secur
e shell (SSH) server, for secure access from remote machines
ii openssh-sftp-server      1:8.9p1-3ubuntu0.6           amd64      secur
e shell (SSH) sftp server module, for SFTP access from remote machines
ii ssh-import-id               5.11-0ubuntu1                   all           secur
ely retrieve an SSH public key and install it locally
test@linuxserver:/var/log/apache2$
上記コマンドで、sshサーバがインストールされていないことが確認できた場合、
test@linuxserver:/var/log/apache2$ sudo apt install openssh-server
を実行しインストールを行った後、もう一度確認してみてください。
2.FWの22番ポートの許可
以下のコマンドで、FWの22番ポートが開いている事を確認します。
test@linuxserver:/var/log/apache2$ sudo ufw status
Status: active
To          Action        From
--           ------         ----
80         ALLOW        Anywhere
22         ALLOW        Anywhere
80 (v6)    ALLOW        Anywhere (v6)
22 (v6)    ALLOW        Anywhere (v6)
開いていない場合は、以下のコマンドを実行してください
test@linuxserver:/var/log/apache2$ sudo ufw allow 22
3.Installed Collectorがログ収集のため利用するユーザの設定
以下のコマンドを実行し、ユーザ(以下例では、remote_collectorという名前のユーザ)を作成してください。
test@linuxserver:/var/log/apache2$ sudo adduser remote_collector
Adding user remote_collector' ...
Adding new group remote_collector' (1001) ...
Adding new user remote_collector' (1001) with group remote_collector'  ...
Creating home directory /home/remote_collector' ...
Copying files from /etc/skel' ...
New password:                        #パスワード入力
Retype new password:                    #再度入力
passwd: password updated successfully
Changing the user information for remote_collector
Enter the new value, or press ENTER for the default
Full Name []:                                                              #Enterクリック
Room Number []: Work Phone []:               #Enterクリック
Home Phone []:                       #Enterクリック
Other []:                                                                    #Enterクリック
Is the information correct? [Y/n] Y
test@linuxserver:/var/log/apache2$
追加されたかを確認する為、以下のコマンドを実行してください
test@linuxserver:/var/log/apache2$ cat /etc/passwd |grep remote_collector
remote_collector:x:1001: 1001:,,,:/home/remote_collector:/bin/bash
test@linuxserver:/var/log/apache2$
test@linuxserver:/var/log/apache2$ su remote_collector
Password:                                                                   #パスワード入力
remote_collector@linuxserver:/var/log/apache2$
4.ログ収集対象が存在するパスのアクセス権限設定
ログ収集対象が存在するパス(以下例では、/var/log/apache2/access.log)をInstalled Collectorからアクセスできるように、以下コマンドを実行し、読み取り・実行権限を付与します。
test@linuxserver:/var/log$ sudo chmod 755 apache2
test@linuxserver:/var/log$ ls -1
total 2872
-rw-r--r--  1 root root    35179   Jan 25 04:16 alternatives.log
drwxr-xr-x 2 root adm    4096    Jan 25 04:16 apache2
(以下略)
test@linuxserver:/var/log/apache2$ cd apache2
test@linuxserver:/var/log/apache2$ sudo chmod 755 access.log
test@linuxserver:/var/log/apache2$ ls -1
total 8
-rwxr-xr-x 1 root adm 1029  Jan 25 04:30 access.log
-rwxr-x--- 1 root adm 556    Jan 25 06:34 error.log
-rw-r----- 1 root adm 0        Jan 25 04:16 other_vhosts_access.log
(以下略)
test@linuxserver:/var/log/apache2$
Sumologic側での設定
Sumologicにログインでき、Installed Collectorのインストールが既にできている状態から始めます。
Installed Collectorのインストール方法については、前の記事から確認できます。
(https://cloudsolution.terilogy.com/blog/sumologic_remote-collector)
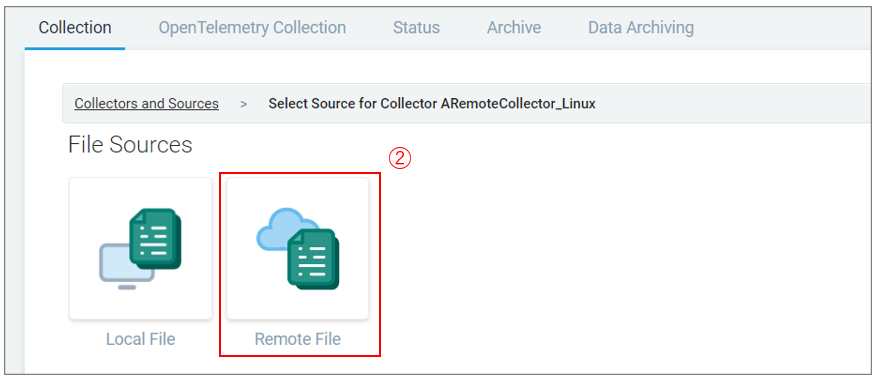
①下図に示すAddをクリック後、Add Sourceをクリック

②File Sourceは以下のRemote Fileをクリック
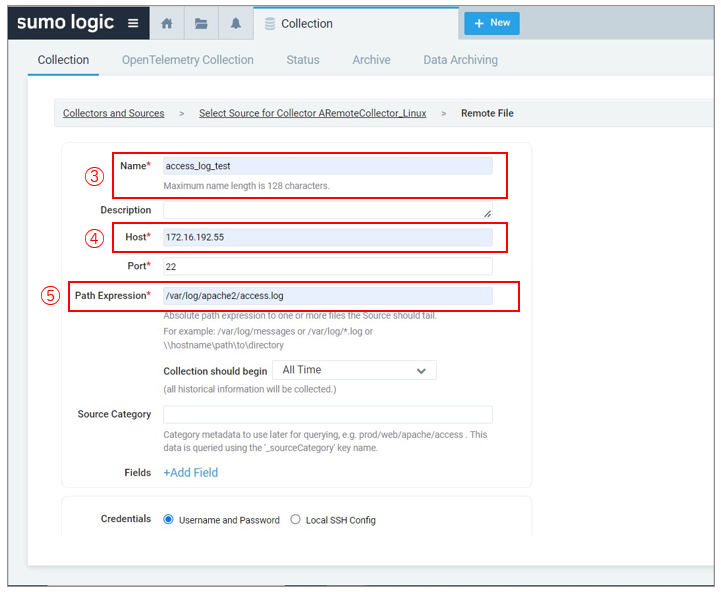
③ソース名を入力
④ログ収集対象機器でip aコマンド等を実行し、確認できたIPアドレスを入力
⑤4.ログ収集対象が存在するパスのアクセス権限設定で設定したパスを入力
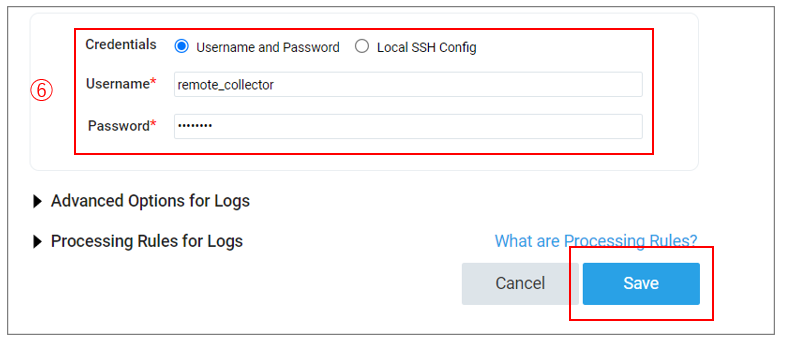
⑥3.Installed Collectorがログ収集のため利用するユーザの設定で設定したユーザを入力
まとめ
"ログ収集対象がLinux(Ubuntu)である場合はどのように設定を行うのか"について、今回の記事では、紹介しました。
Remote Collectorとはそもそも何か?Installed Collectorはどのようにインストールを行うかなど基本的な部分については先日の記事を確認していただければと思います。
改めまして、本記事を最後までお付き合いいただきありがとうございました。
これからもSumo Logicに関する記事を書いていきますので、今後ともよろしくお願いします。


![[日本語化]クラウド SIEM ダッシュボードと KPI を毎日のスタンドアップで使用して SOC の効率を向上させる方法](http://www.sumologic.com/wp-content/uploads/CloudSIEMdashboards_Blog_header_700x200-1-1.png)
